The mentioned functionalities may be restricted depending on the purchased software license.
Komma igång med offentliga visningar
SmartgridX:s verktyg för offentliga visningar är utformat för att skapa helt anpassningsbara visualiseringar för installationer. Oavsett om du behöver interna analysinstrument eller snabba och lättillgängliga visuella visningar, erbjuder offentliga visningar flexibla, anpassningsbara och användarvänliga konfigurationsalternativ.
Denna guide ger en snabb översikt över offentliga visningar, som täcker de viktigaste komponenterna och deras effektiva användning. Detaljerad information för varje komponent finns på deras respektive dokumentationssidor.
⚠️ Denna funktion är för närvarande under aktiv utveckling - nya funktioner och alternativ kommer ständigt att läggas till. För förslag eller funktionalitetsförfrågningar, vänligen kontakta vårt supportteam.
Översikt
Det offentliga visningssystemet ger användare möjlighet att skapa anpassade visualiseringar för sina installationer med full kontroll över visningslayout och innehåll.
Arbetsflödesöversikt
För att ställa in offentliga visningar i SmartgridX, följ denna tredelade process:
- 🎛️ Registrera din kontroller - Registrera den offentliga visningskontrollern till ditt konto
- 📐 Skapa en mall - Designa den visuella layouten för din installation
- ⚙️ Konfigurera den offentliga visningen - Konfigurera mallen för din installation och länka den till kontrollern
💡 Pro Tips: Du kan skapa och testa mallar utan fysisk hårdvara - hoppa helt enkelt över steg 1 för att förhandsgranska dina designer innan de distribueras.
Steg-för-steg-installation
1. Offentlig visningskontroller
📖 För detaljerad information om kontrollen, besök Public display Controller dokumentationssidan.
Detta avsnitt täcker registrering och hantering av din offentliga visningskontrollerhårdvara.
🚀 Snabbstartalternativ: Vill du utforska offentliga visningar utan hårdvara? Hoppa till Steg 2: Mallskapande för att designa och förhandsgranska mallar. Du kan alltid registrera en kontroller senare!
⚠️ Obs: Utan en registrerad kontroller kan du fortfarande skapa och konfigurera mallar för att förhandsgranska det slutgiltiga resultatet, men den offentliga visningen kommer inte att visas på fysisk hårdvara.
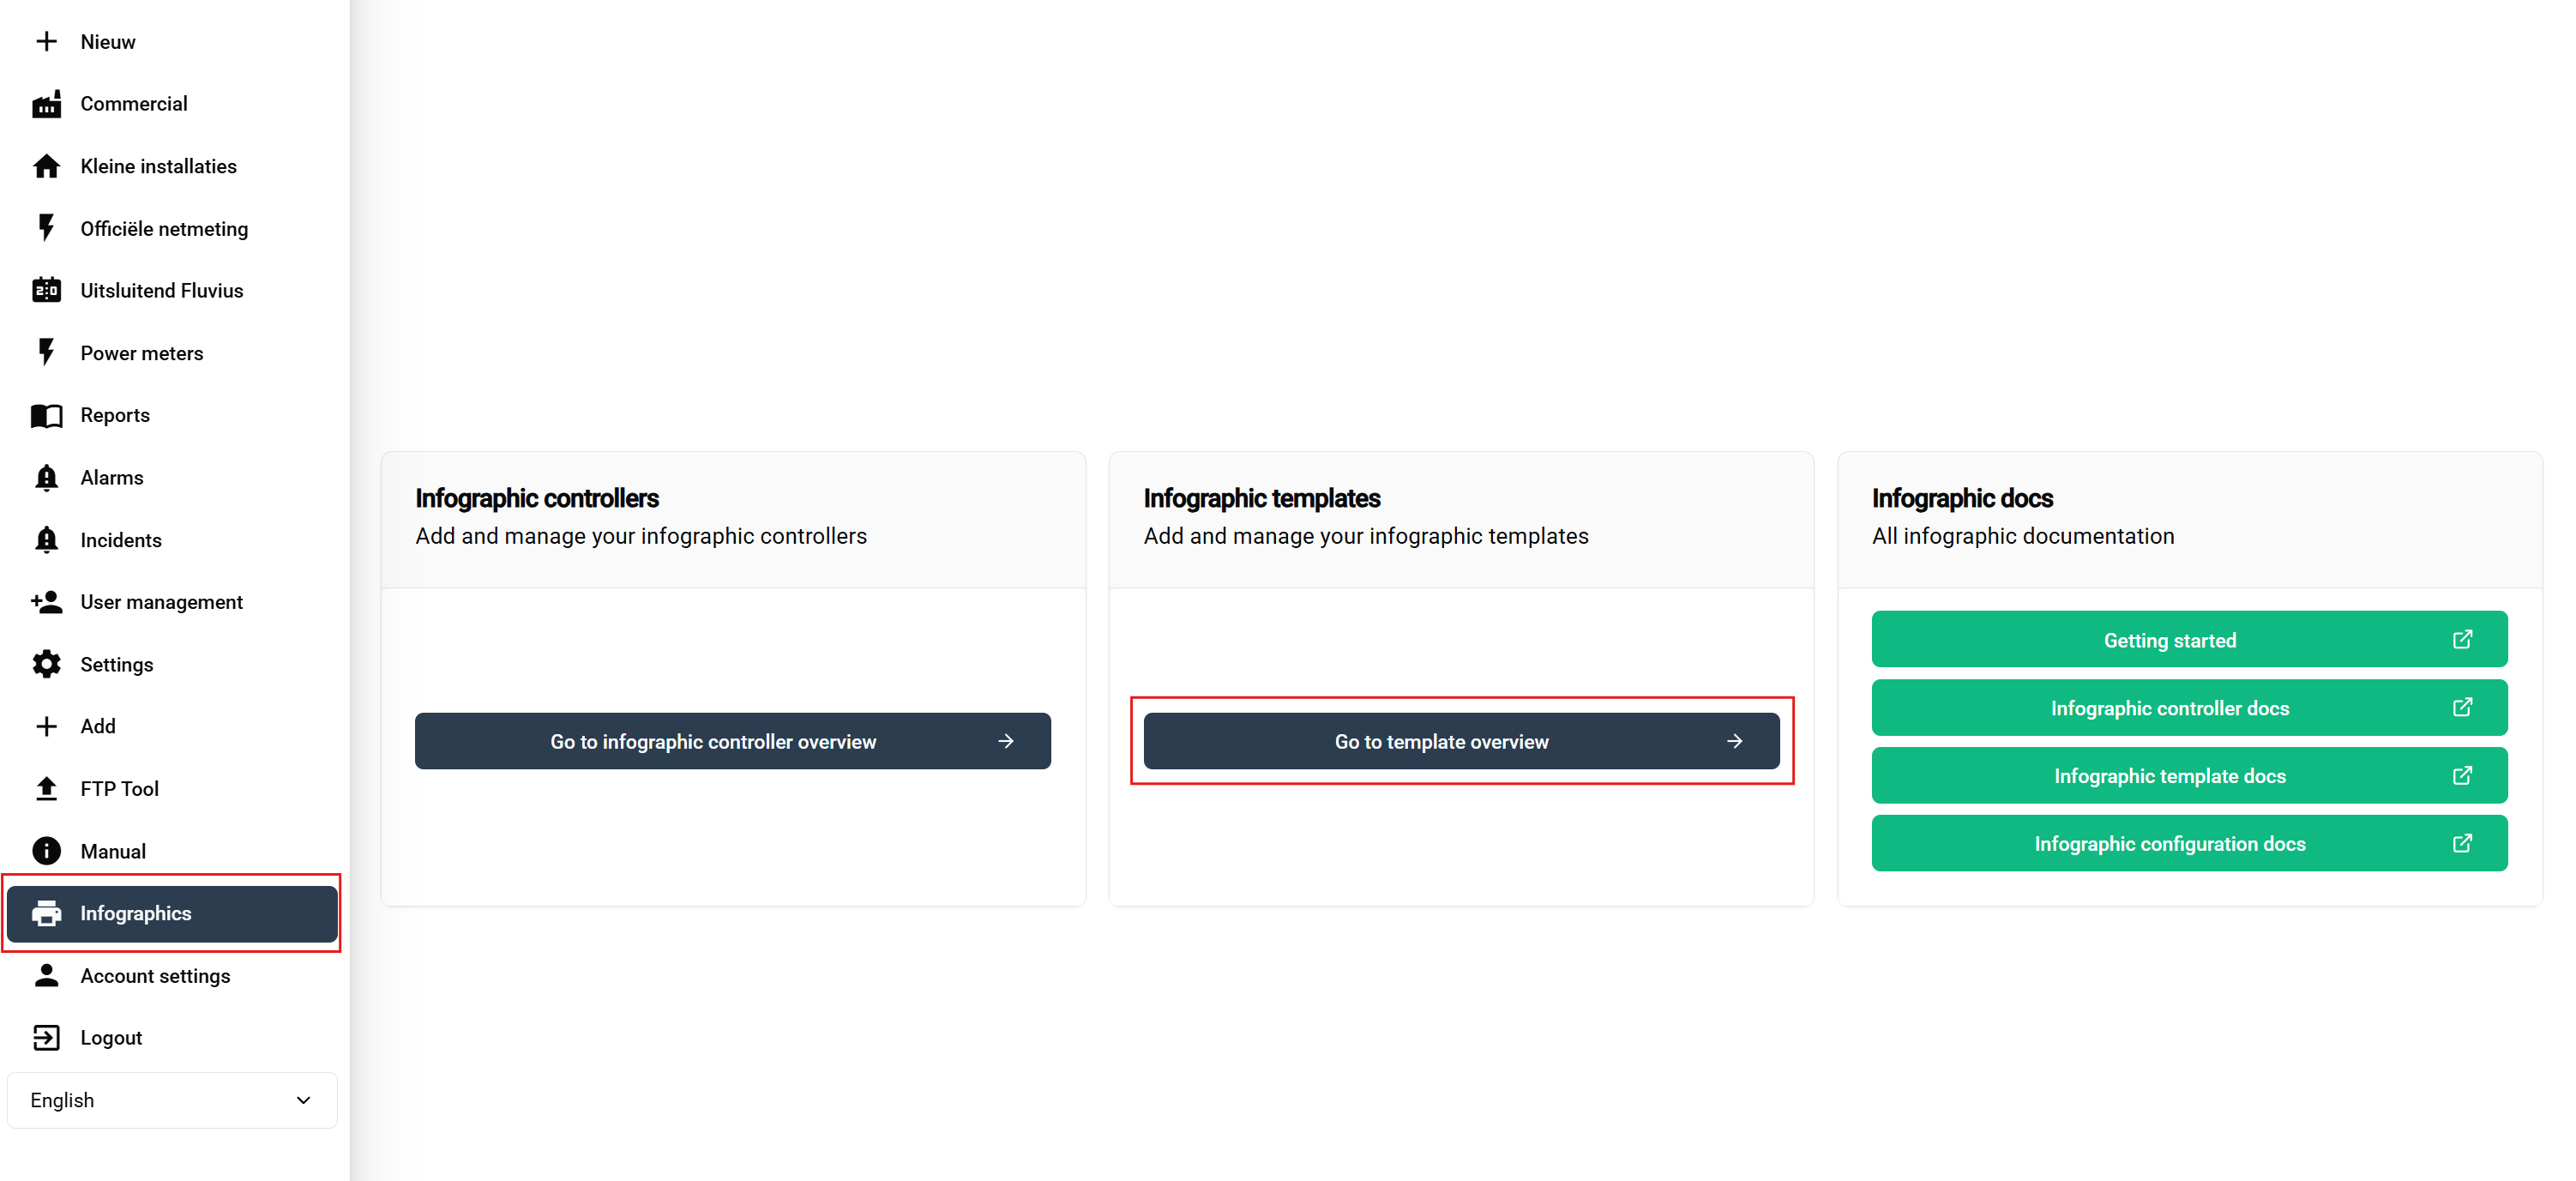
Navigering till Kontrollerhantering

- Navigera till Offentliga visningar: Klicka på sektionen 'Offentliga visningar' i sidofönstret
- Åtkomst till Kontrollersektionen: På översiktssidan, lokalisera och klicka på knappen Offentlig visningskontroller (markerad i skärmbilden ovan)
Översikt över Kontrollertabell

Kontrollertabellen visar:
- 📋 Översikt över alla dina registrerade kontroller
- ➕ Registrera nya kontroller knapp (övre högra hörnet)
- ✏️ Hanteringsalternativ för befintliga kontroller
Registrera Din Kontroller
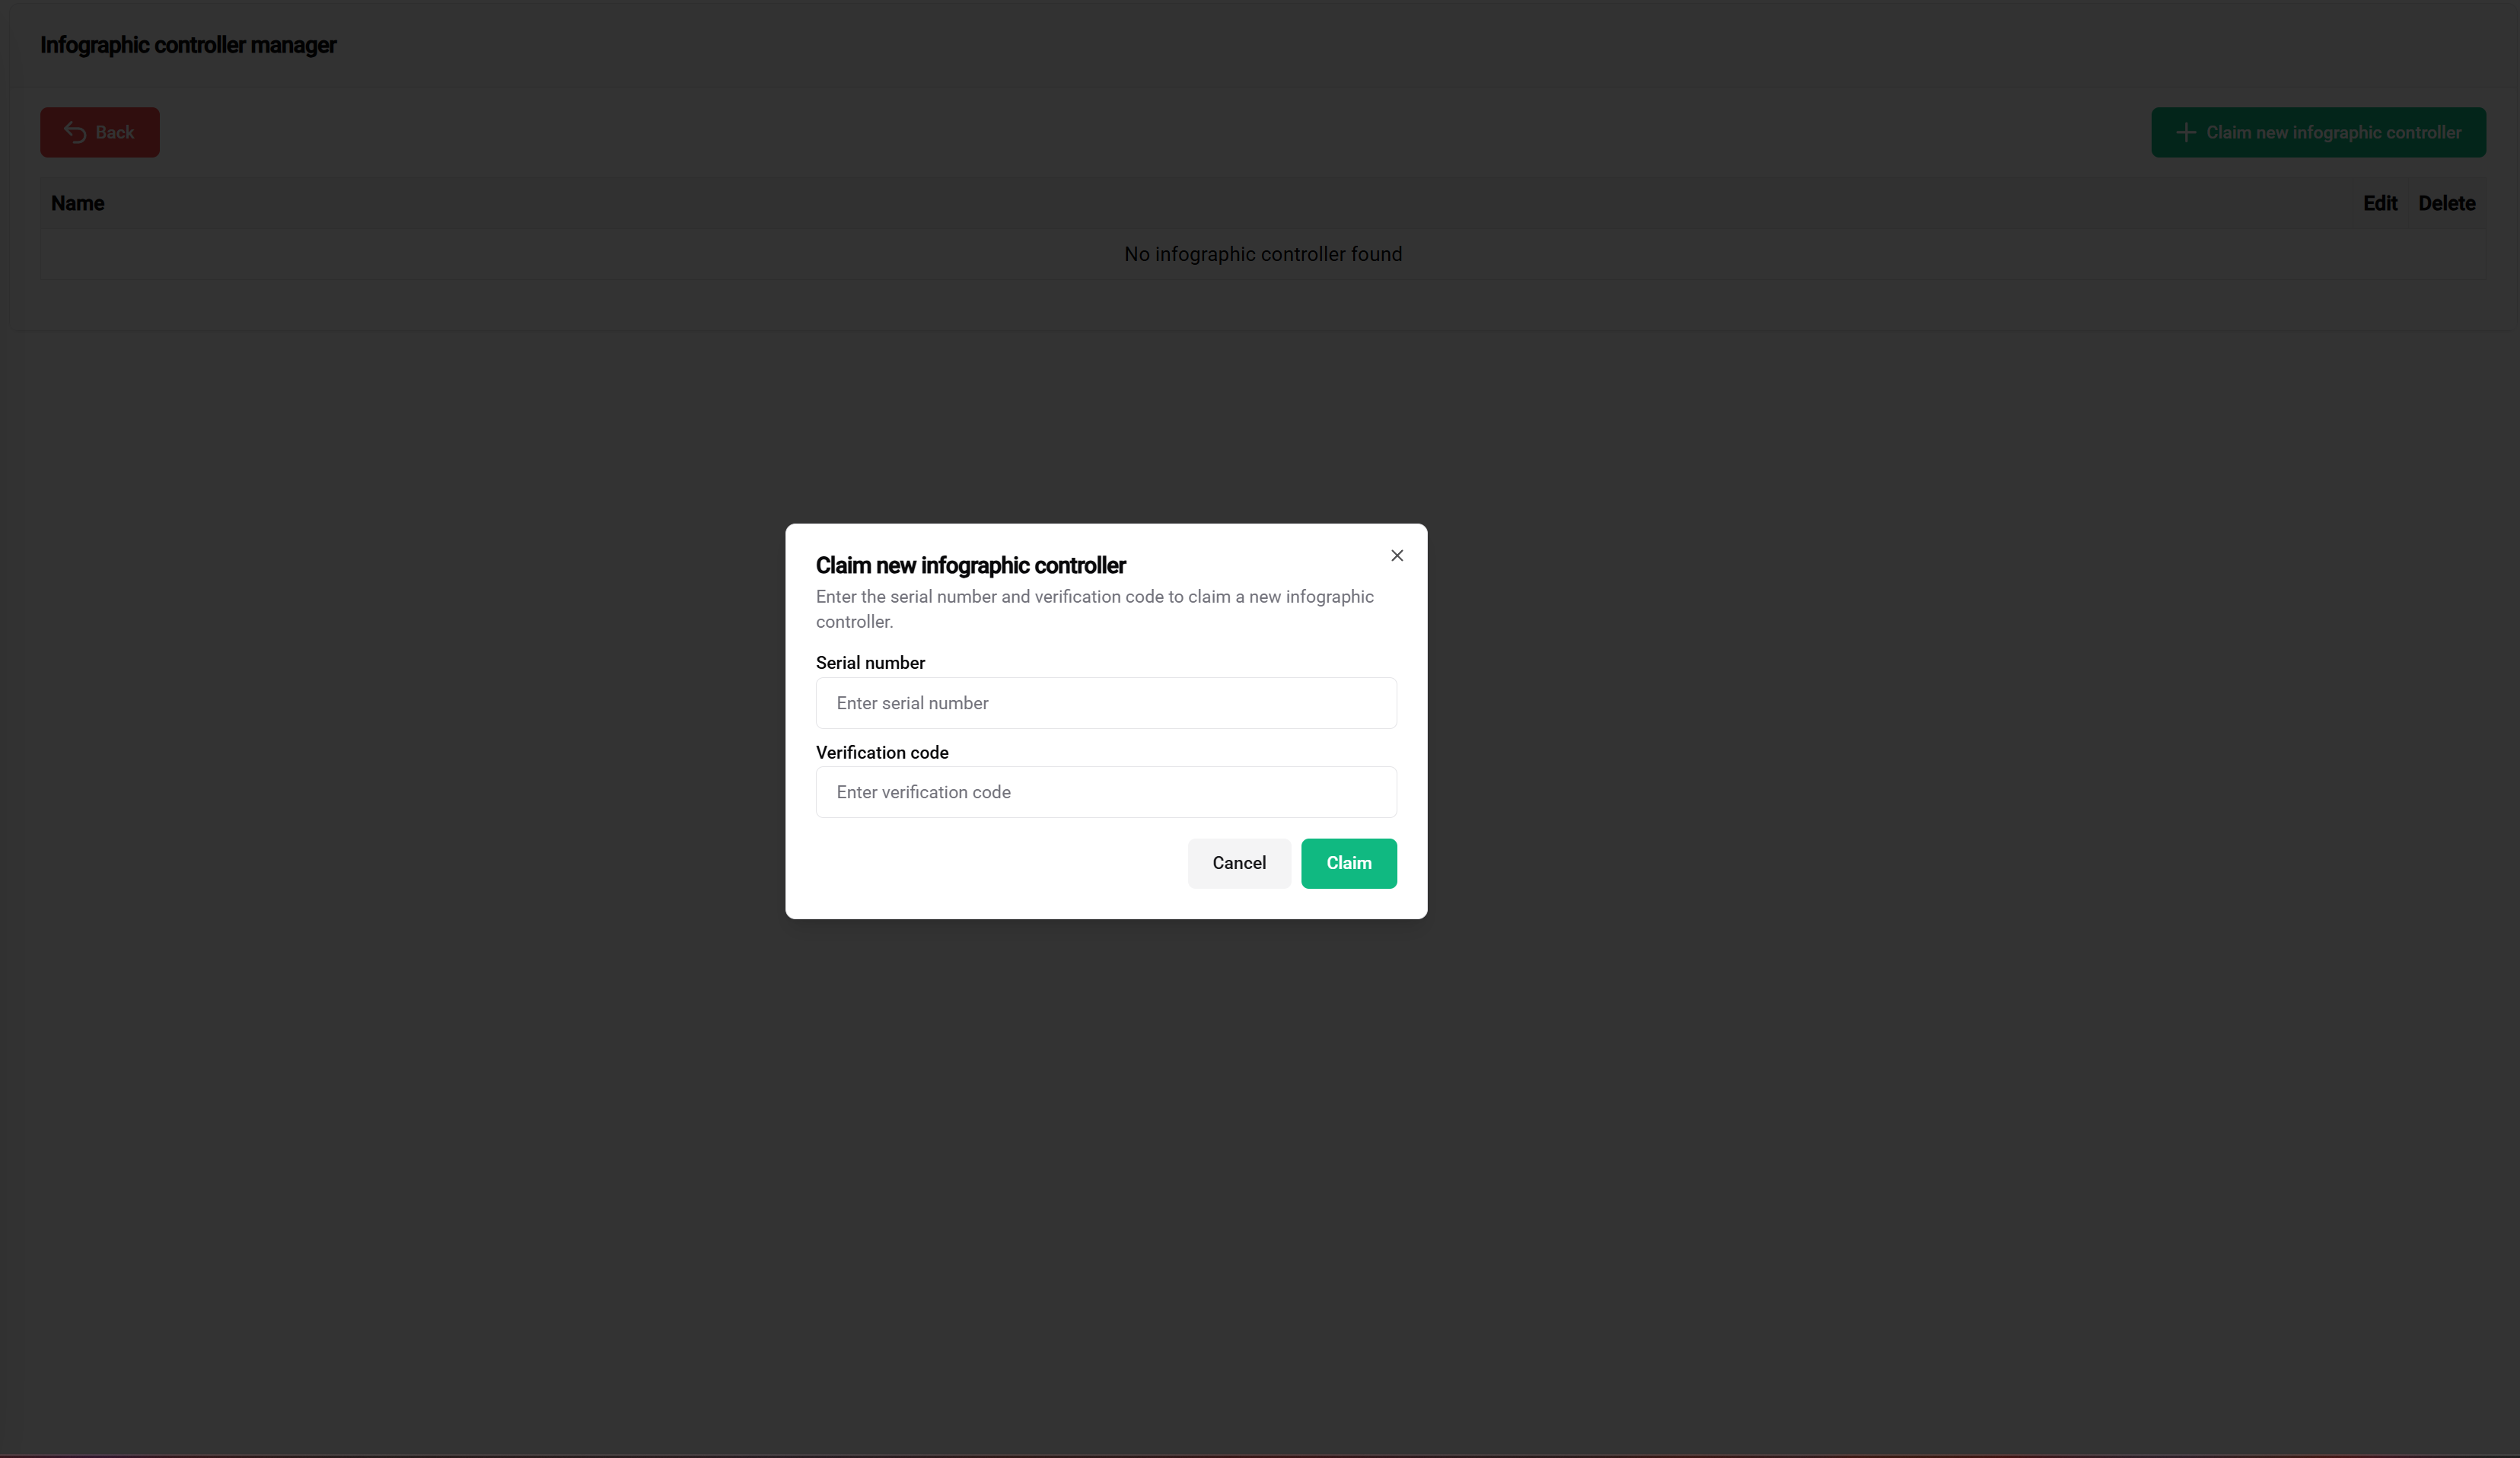
Steg för att registrera:
- Klicka på knappen grön "Registrera kontroller"
- Ange serienumret (finns på kontrollerns klistermärke)
- Ange verifieringskoden (finns på kontrollerns klistermärke)
🔐 Spara dina kontrolleraktionenuppgifter på ett säkert sätt! Förvara serienumret och verifieringskoden i en säker fil (Excel, textfil, etc.). Vårt supportteam kan inte ge verifieringskoder av säkerhetsskäl.
Framgångsrikt Registrerad Kontroller

✅ Framgång! Din kontroller visas nu i tabellen med alternativ för att:
- 📝 Redigera kontrollerens namn
- 🔓 Avregistrera om det behövs
2. Offentlig visningsmall
📖 För omfattande vägledning för skapande av mallar, besök Public display Template dokumentationssidan.
I detta steg kommer du att designa den visuella layouten för din installation. Mallar fungerar som återanvändbara ritningar som definierar hur din offentliga visning kommer att struktureras och visas.
📝 Komma igång-not: Detta avsnitt ger nödvändiga steg för skapande av mallar. För avancerade anpassningsalternativ och detaljerad konfiguration, se den fullständiga malldokumentationen.
Åtkomst till Mallhanterare
Navigeringssteg:
- Gå till 'Offentliga visningar' i sidofönstret
- Klicka på knappen 'Offentlig visningsmall' på översiktssidan
Gränssnitt för Mallhantering

Malltabellen tillhandahåller:
- 📋 Översikt över alla dina mallar
- ➕ Lägg till nya mallar
- ✏️ Redigera befintliga mallar
- 🗑️ Ta bort mallar
Konfiguration av Mallens Rubrik
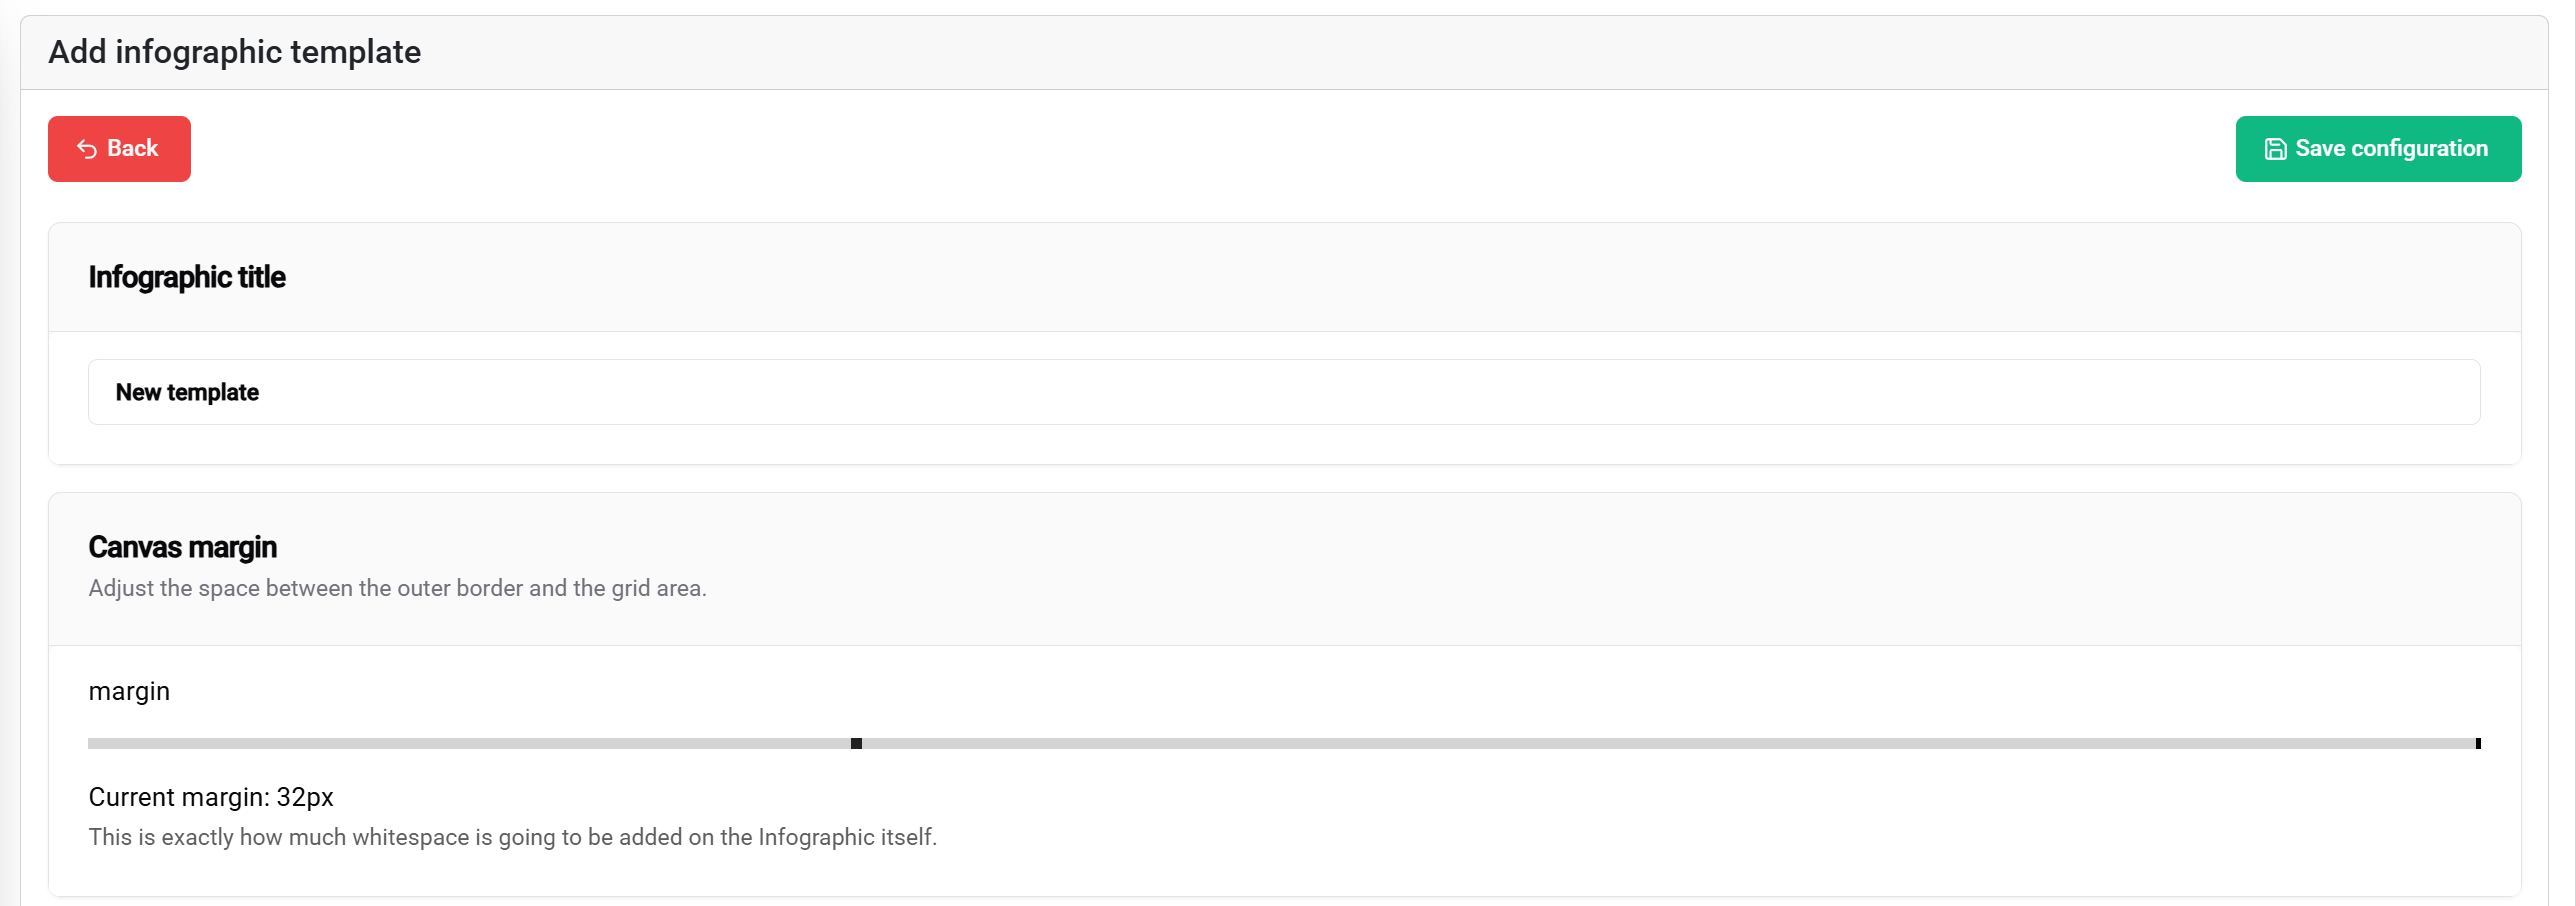
Rubrikinställningarna inkluderar:
- 📝 Malltitel - Namnge din offentliga visning
- 📐 Marginalinställningar - Definiera avstånd runt innehåll
- 💾 Spara-knapp - Ligger i övre högra hörnet
Blocklayoutsystem
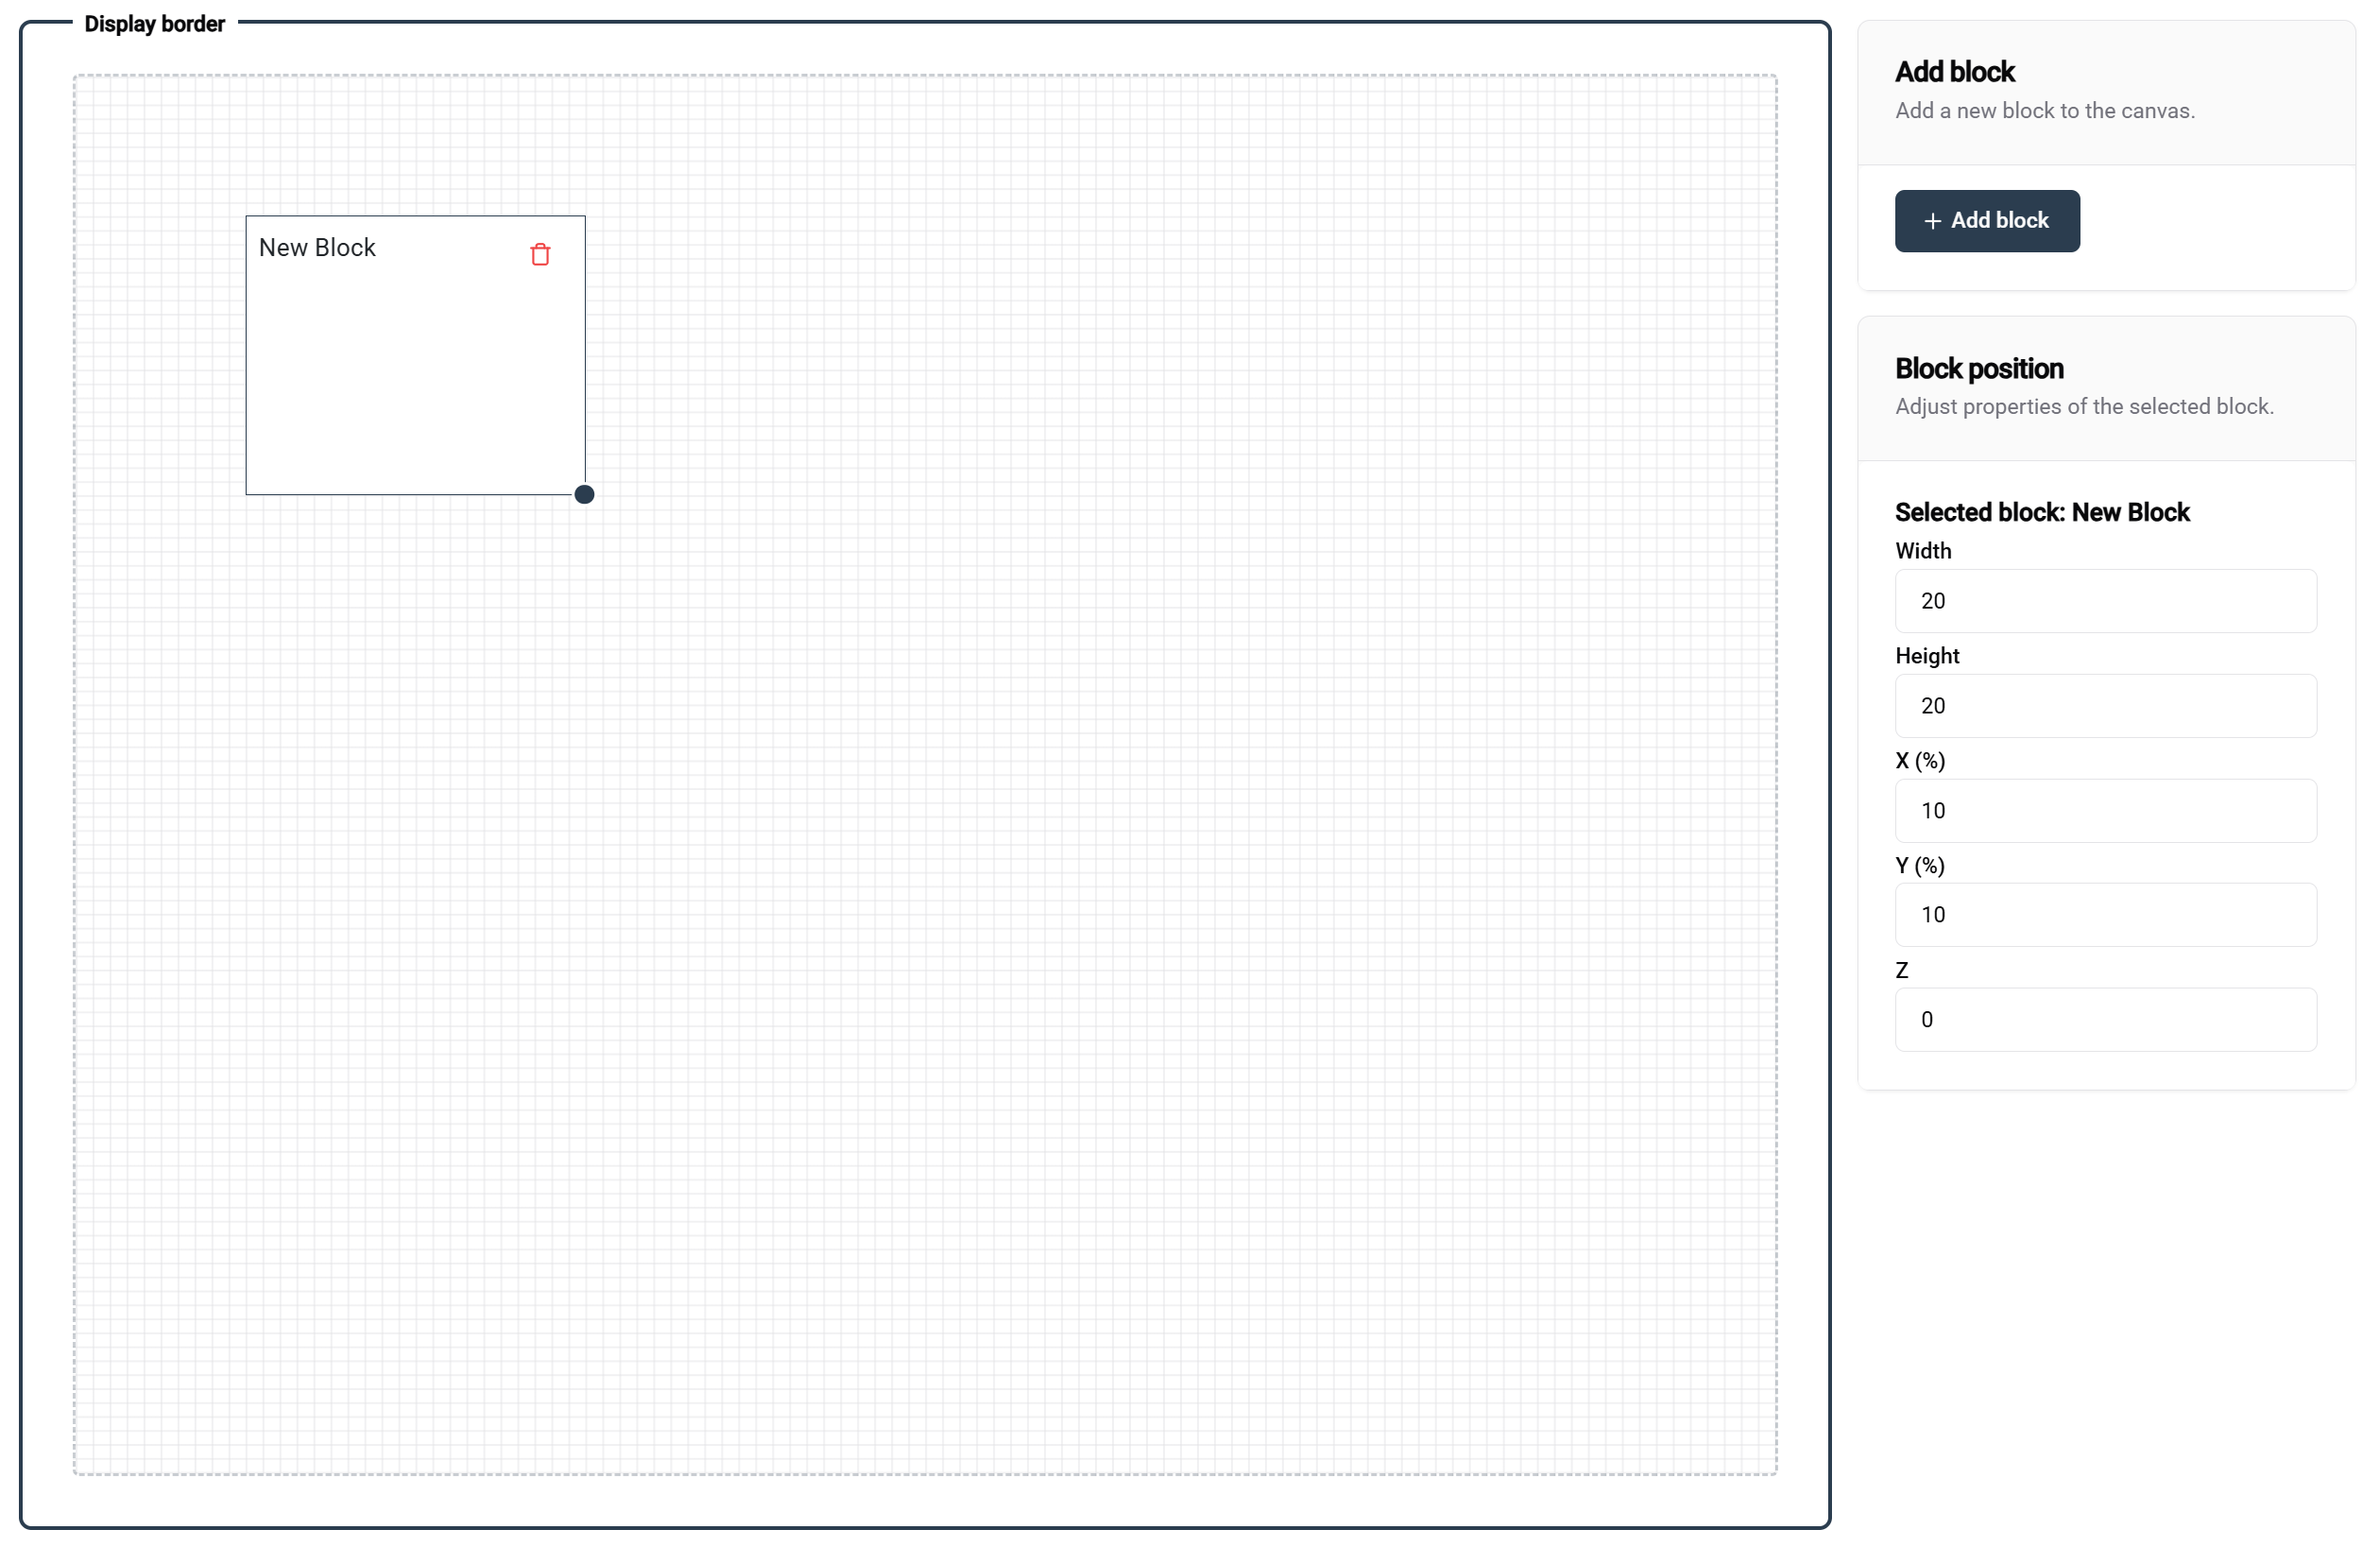
Arbeta med block:
- ➕ Lägg till block med hjälp av knappen i övre högra hörnet
- 🎯 Positionera block genom att dra och släppa
- 📏 Ändra storlek på block genom att dra i handtaget i nedre högra hörnet
📐 Detaljer om rutnätssystemet:
- Rutnätsstorlek: 100×100 (procentbaserat)
- Exempel på layouter:
- Två block med 50% bredd × 100% höjd = sidolayout
- Ett block med 100% bredd × 100% höjd = full täckning
🎛️ Precision Controls:
- Använd panelen till höger för exakta positionsvärden
- Perfekt för finslipning av blockplacering
Blockkonfiguration
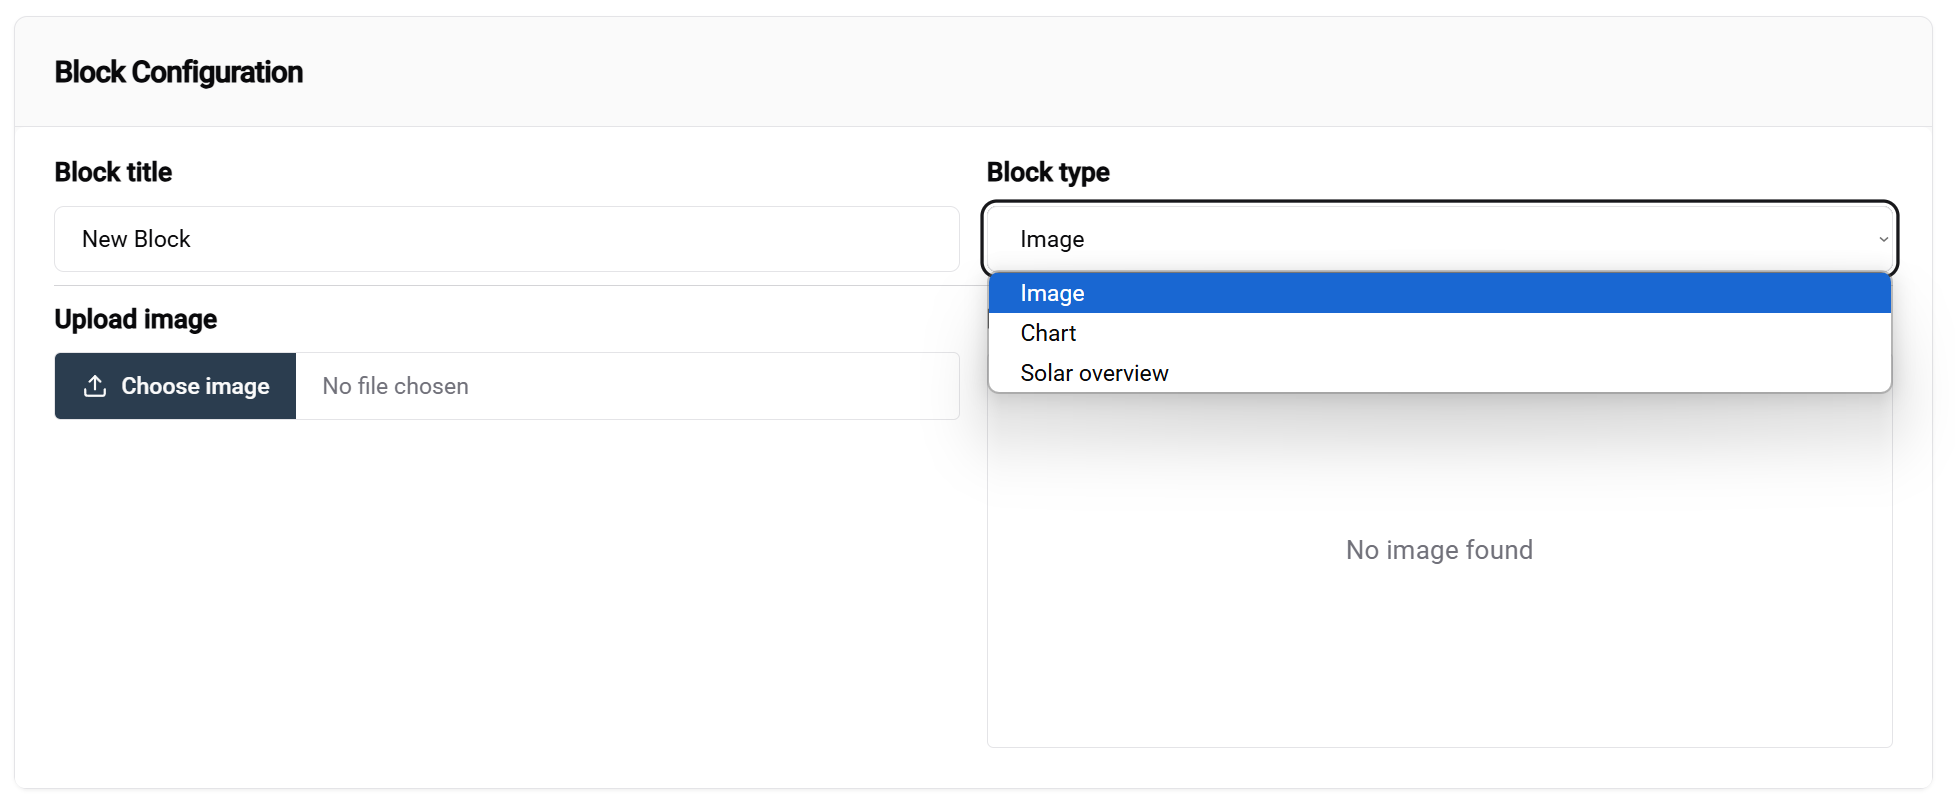
Konfigurationsarbetsflöde:
- Välj ett block för att se dess alternativ
- Välj blocktyp från rullgardinsmenyn (den viktigaste inställningen)
- Konfigurera blockspecifika inställningar i den nedre panelen
📚 Lär dig mer: Detaljerad information om olika blocktyper finns i Public display Template dokumentationen.
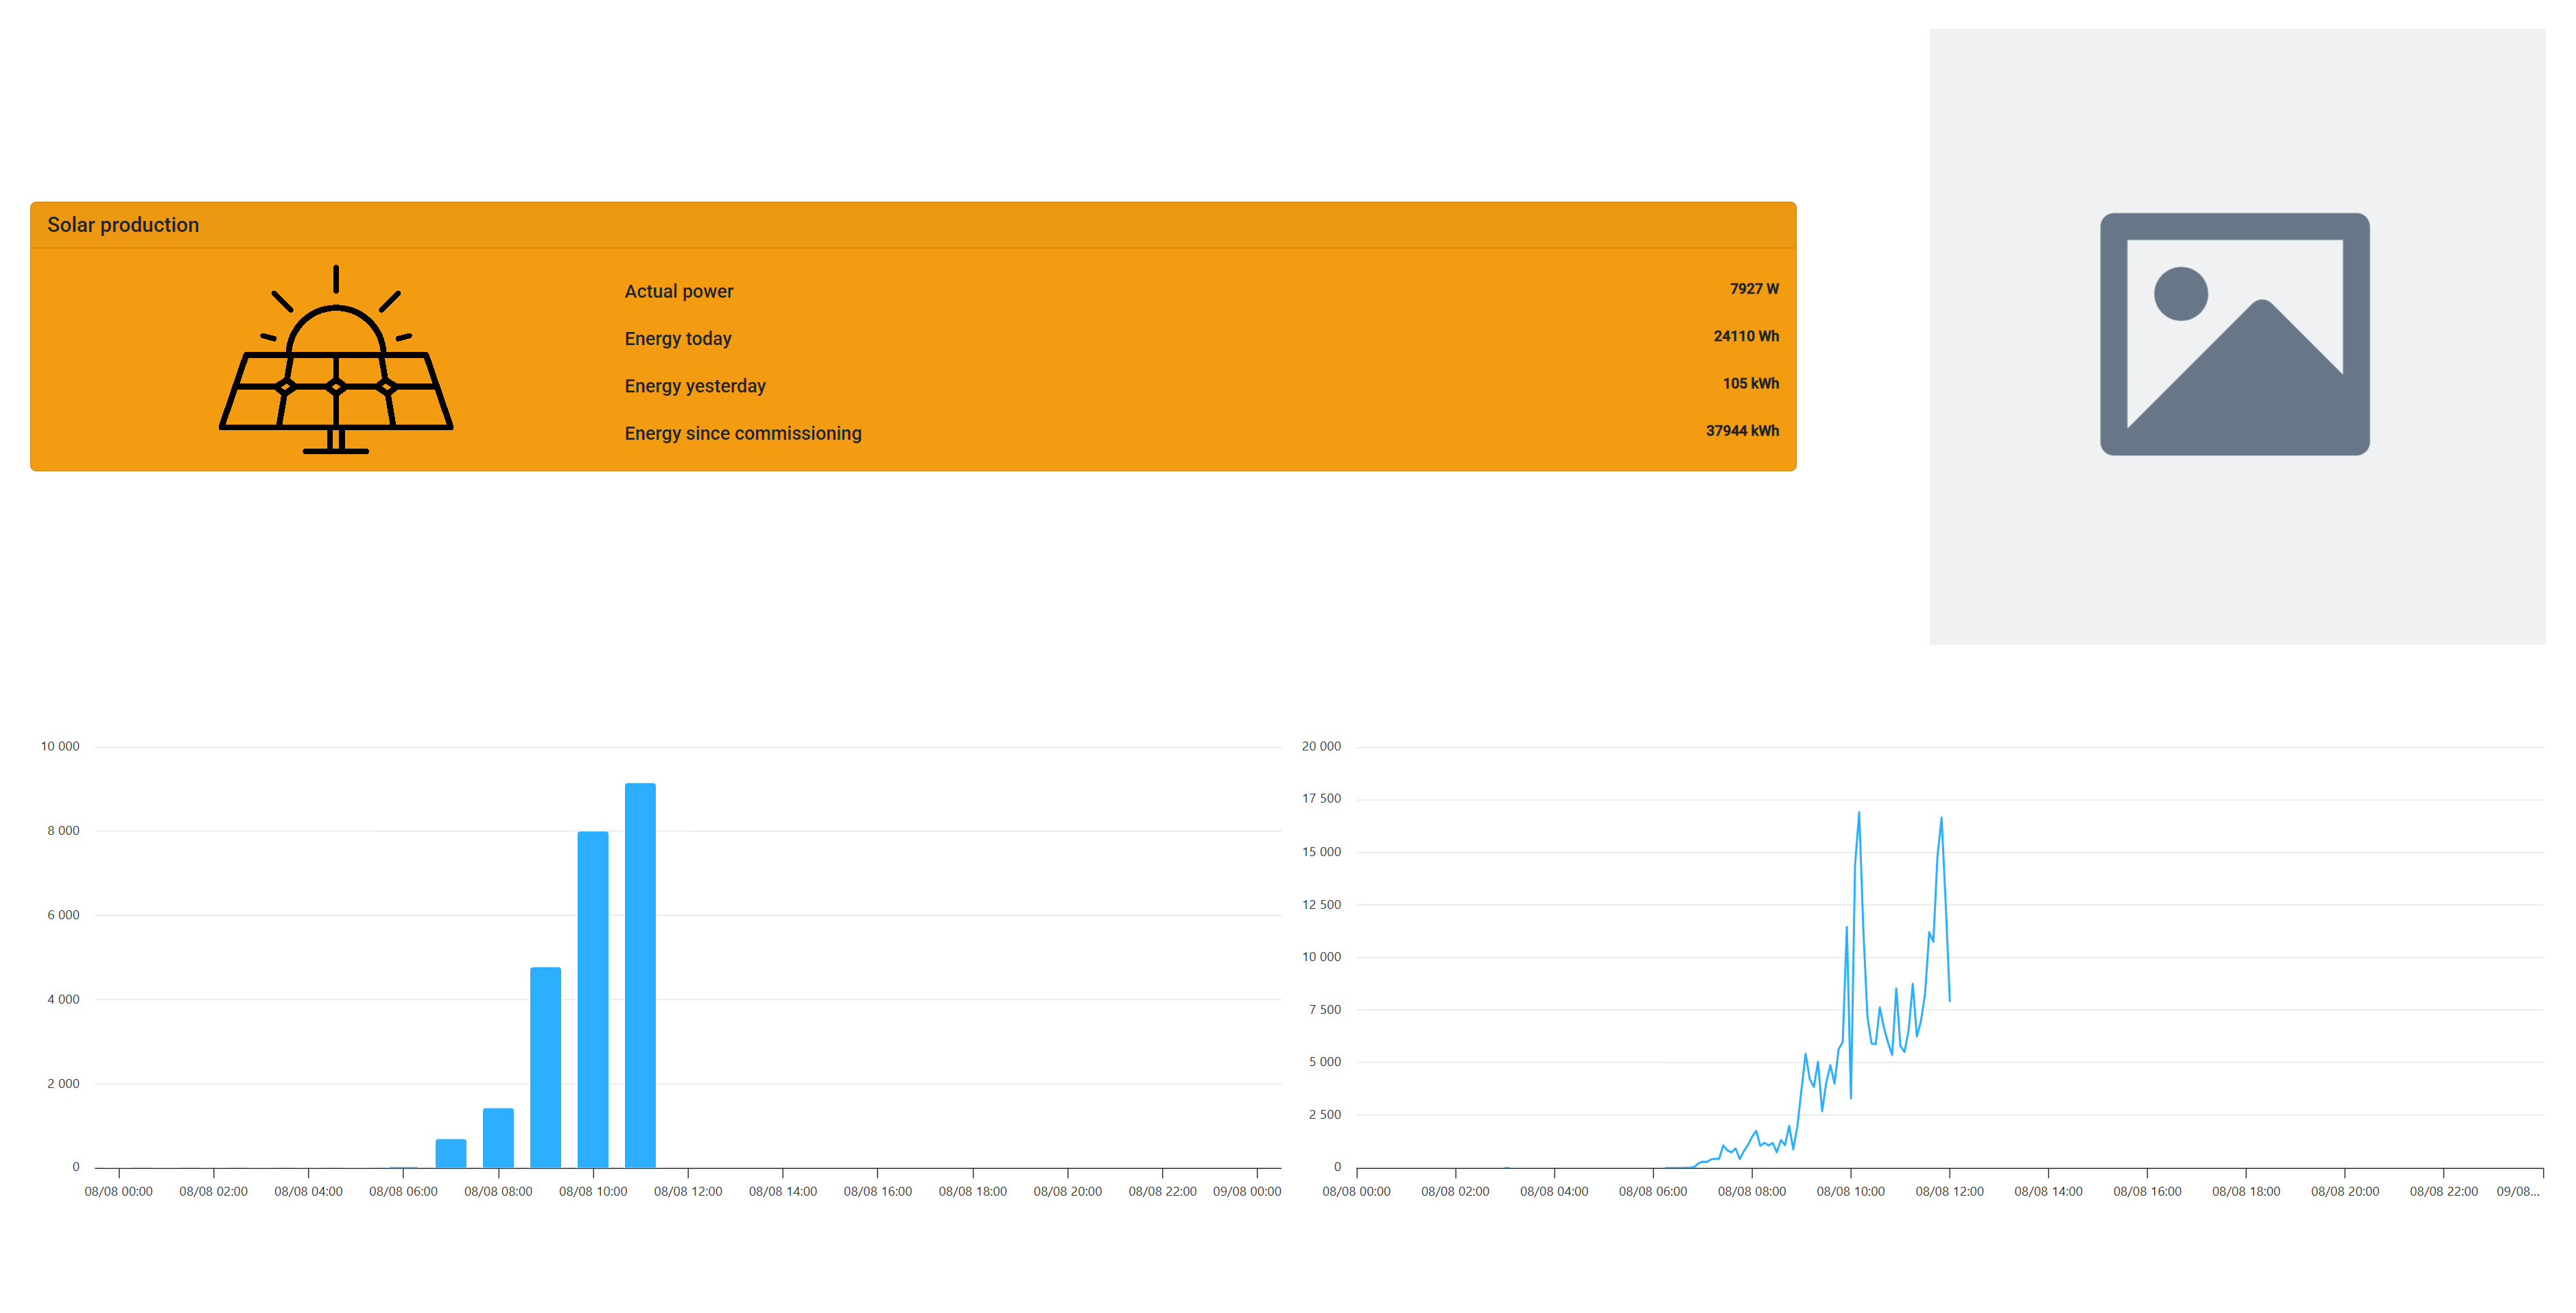
Exempel på Mallkonfiguration
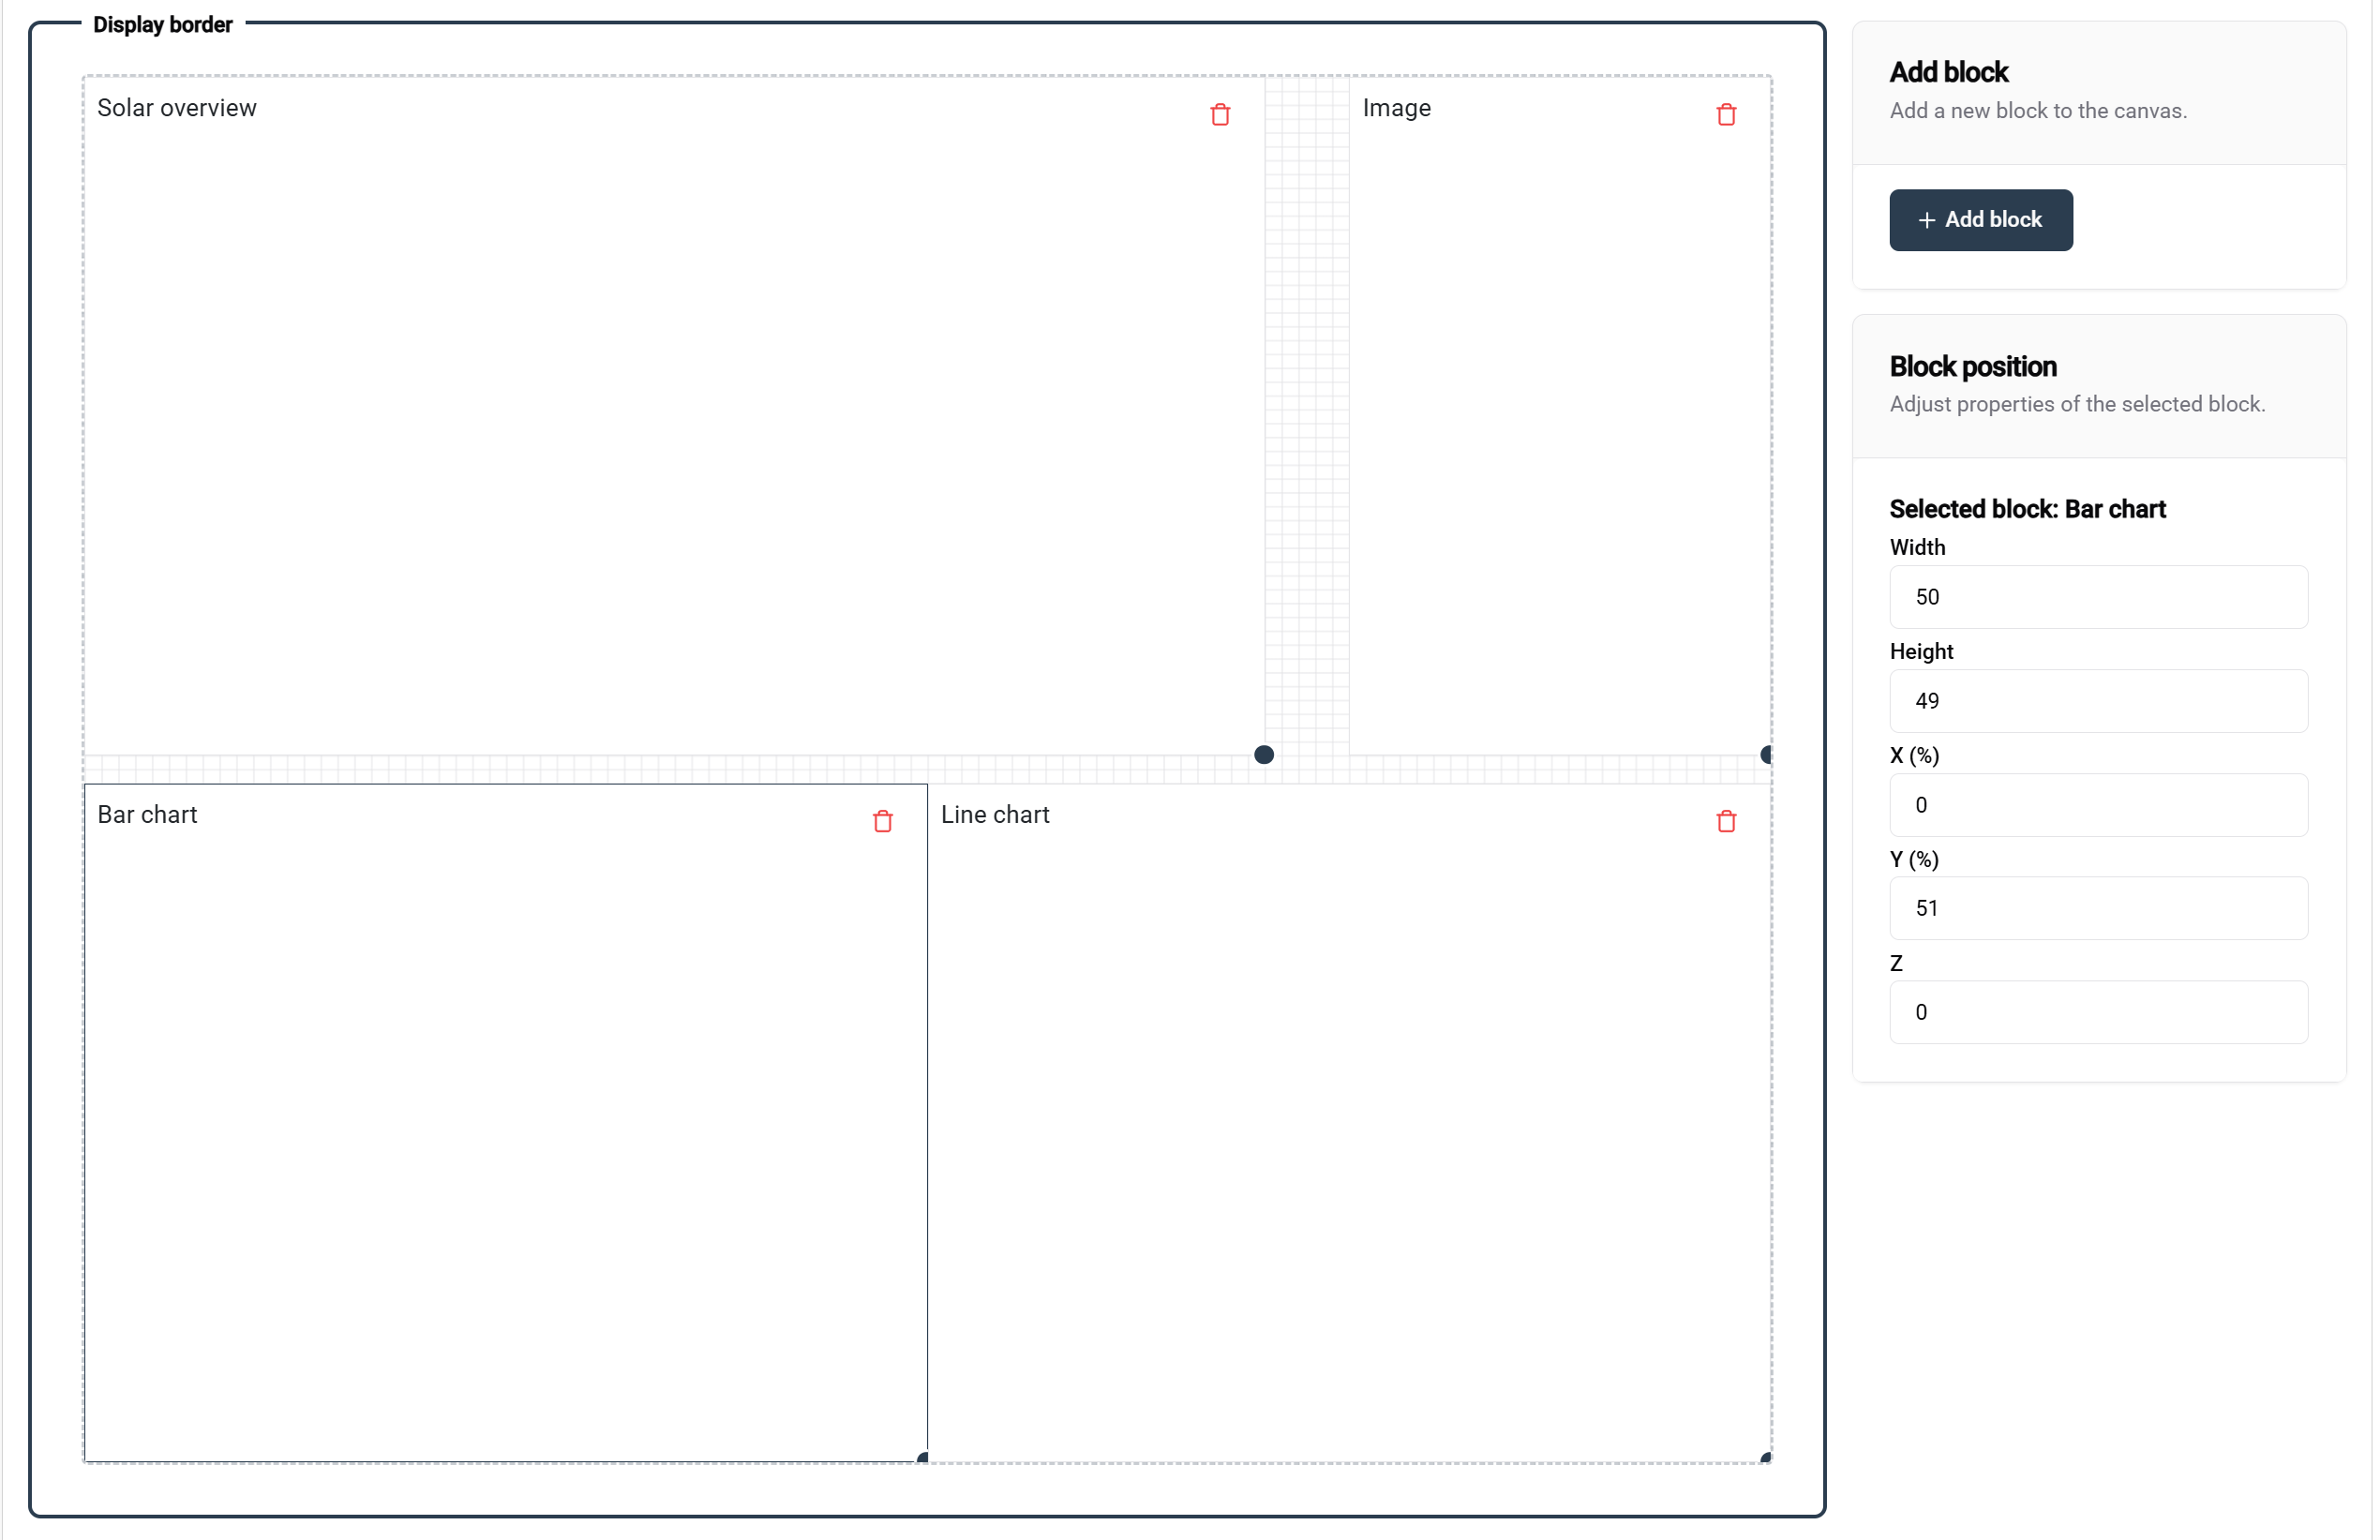
Detta exempel visar en fullständig malluppsättning med märkta block som visar deras respektive konfigurationer och syften.
💾 Spara din mall:
- Klicka på spara-knappen (övre högra hörnet) när du är nöjd med din design
- Din mall blir tillgänglig för användning i konfigurationer
Mallöversikt

✅ Mall skapad framgångsrikt! Din nya mall visas nu i hanteringstabellen, redo för:
- ✏️ Ytterligare redigering
- 🗑️ Borttagning om det behövs
- ⚙️ Konfiguration i nästa steg
3. Konfiguration av offentlig visning
📖 För detaljerade konfigurationsalternativ, besök Public display Configuration dokumentationssidan.
I det här sista steget kommer du att tillämpa din mall på en specifik installation och eventuellt länka den till din tilldelade kontroller.
🎯 Resultat efter slutförande:
- Med kontroller: Visa din offentliga visning på den fysiska visningsenheten
- Utan kontroller: Förhandsgranska hur din offentliga visning kommer att se ut när den distribueras
🧪 Testfördelar: Du kan förbereda och testa mallar och konfigurationer innan du länkar dem till kontroller, vilket säkerställer att allt fungerar perfekt före distribution.
Åtkomst till Konfiguration
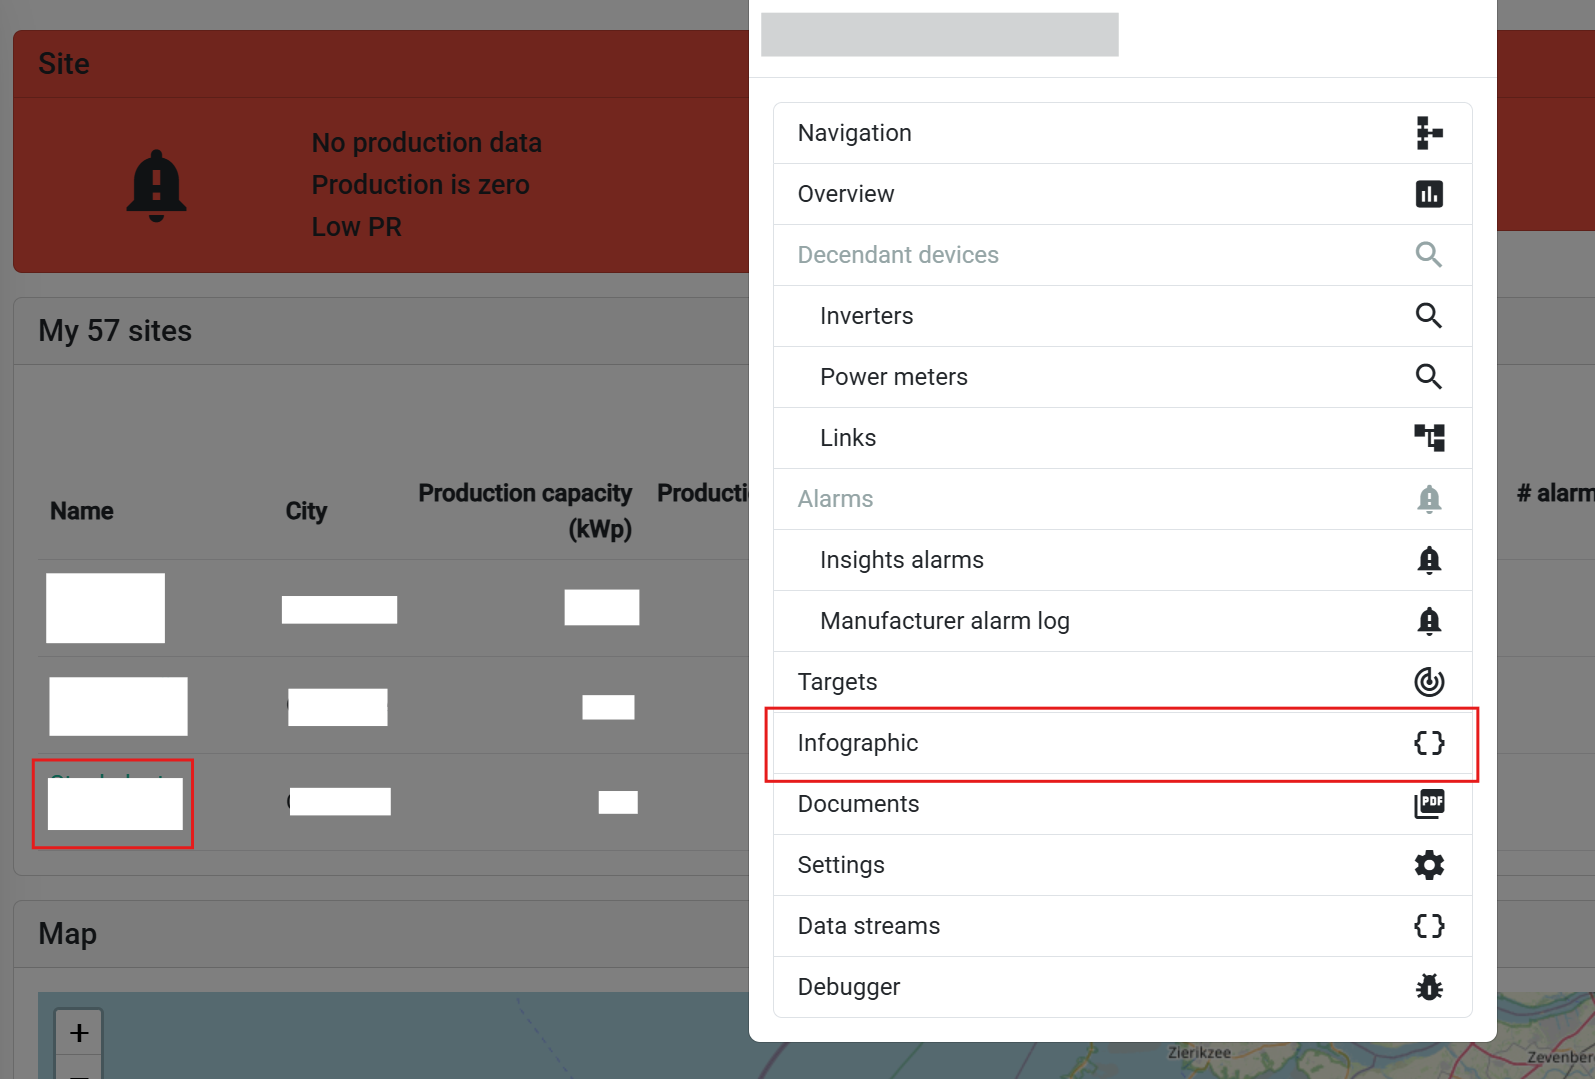
Navigeringssteg:
- Gå till din installationsöversiktssida
- Välj en installation eller kontroller från listan
- Välj 'Offentlig visning' från popup-menyn
Konfigurationshantering

Konfigurationstabellen visar:
- 📋 Alla befintliga konfigurationer för den valda installationen
- ➕ Lägg till ny konfiguration knapp (övre vänstra hörnet)
Skapa en Ny Konfiguration

Konfigurationsinställningar:
- Välj mall från rullgardinsmenyn
- Välj din tidigare skapade mall
- Granska tillgängliga block och deras redigerbara egenskaper
Block-specifik Konfiguration
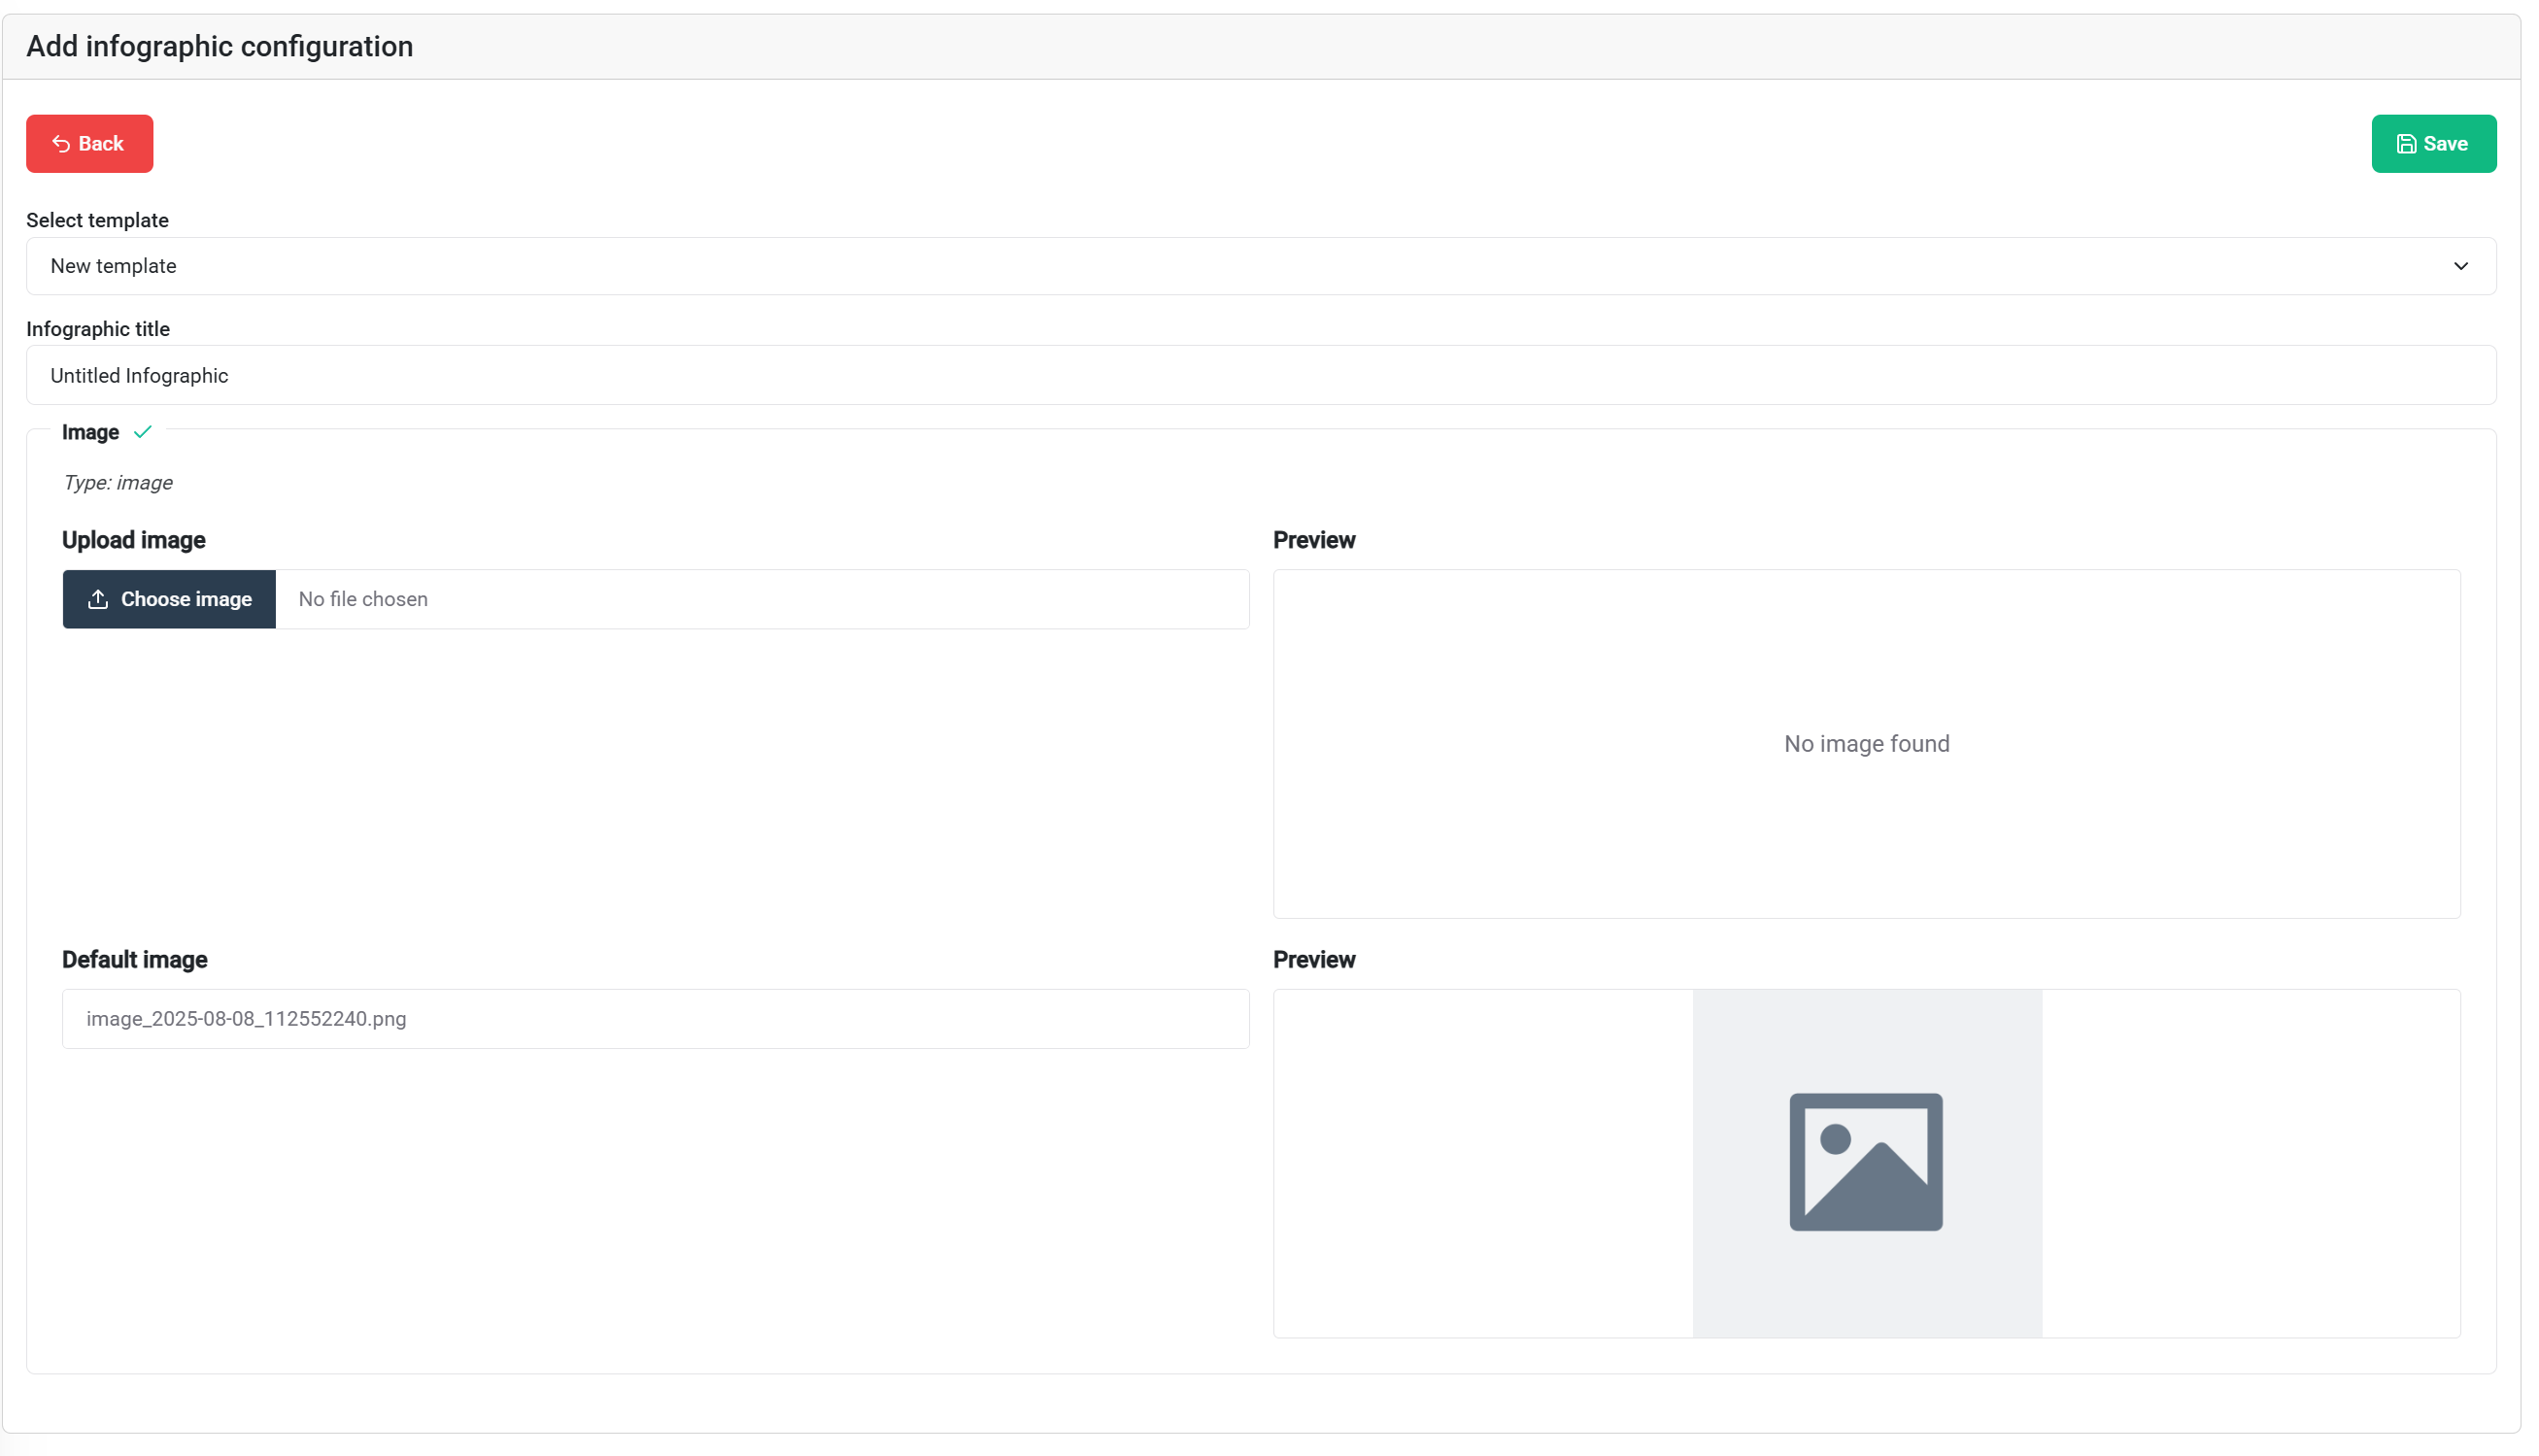
Konfigurationsalternativ:
- Inte alla block är för närvarande konfigurerbara. Detta kommer att ändras när utvecklingen fortsätter.
- Förifyllda innehåll från mallar kan användas som det är eller anpassas
- Överskriv standardinställningar med installationsspecifikt innehåll
💡 Tips: Standardbilder från mallar ger en grund - anpassa endast vad som behöver vara installationsspecifikt.
💾 Spara din konfiguration med knappen för att spara uppe till höger när du är redo.
Konfigurationsåtgärder

Tillgängliga åtgärder för sparade konfigurationer:
- 🎛️ Reklamera Kontroller - Koppla till hårdvaruenheten
- 👁️ Visa - Förhandsgranska det slutgiltiga resultatet
- ✏️ Redigera - Ändra konfigurationsinställningar
- 🗑️ Radera - Ta bort konfiguration
Förhandsgranska Din Offentliga Visning
Förhandsgranskningsfunktioner:
- Realtidsvisualisering av hur den offentliga visningen kommer att se ut på kontrollen
- Responsiv testning - ändra storlek på webbläsarfönstret för att se hur layouten anpassas till olika skärmstorlekar
- Slutgiltig validering före distribution av kontroller
Länka till Kontroller
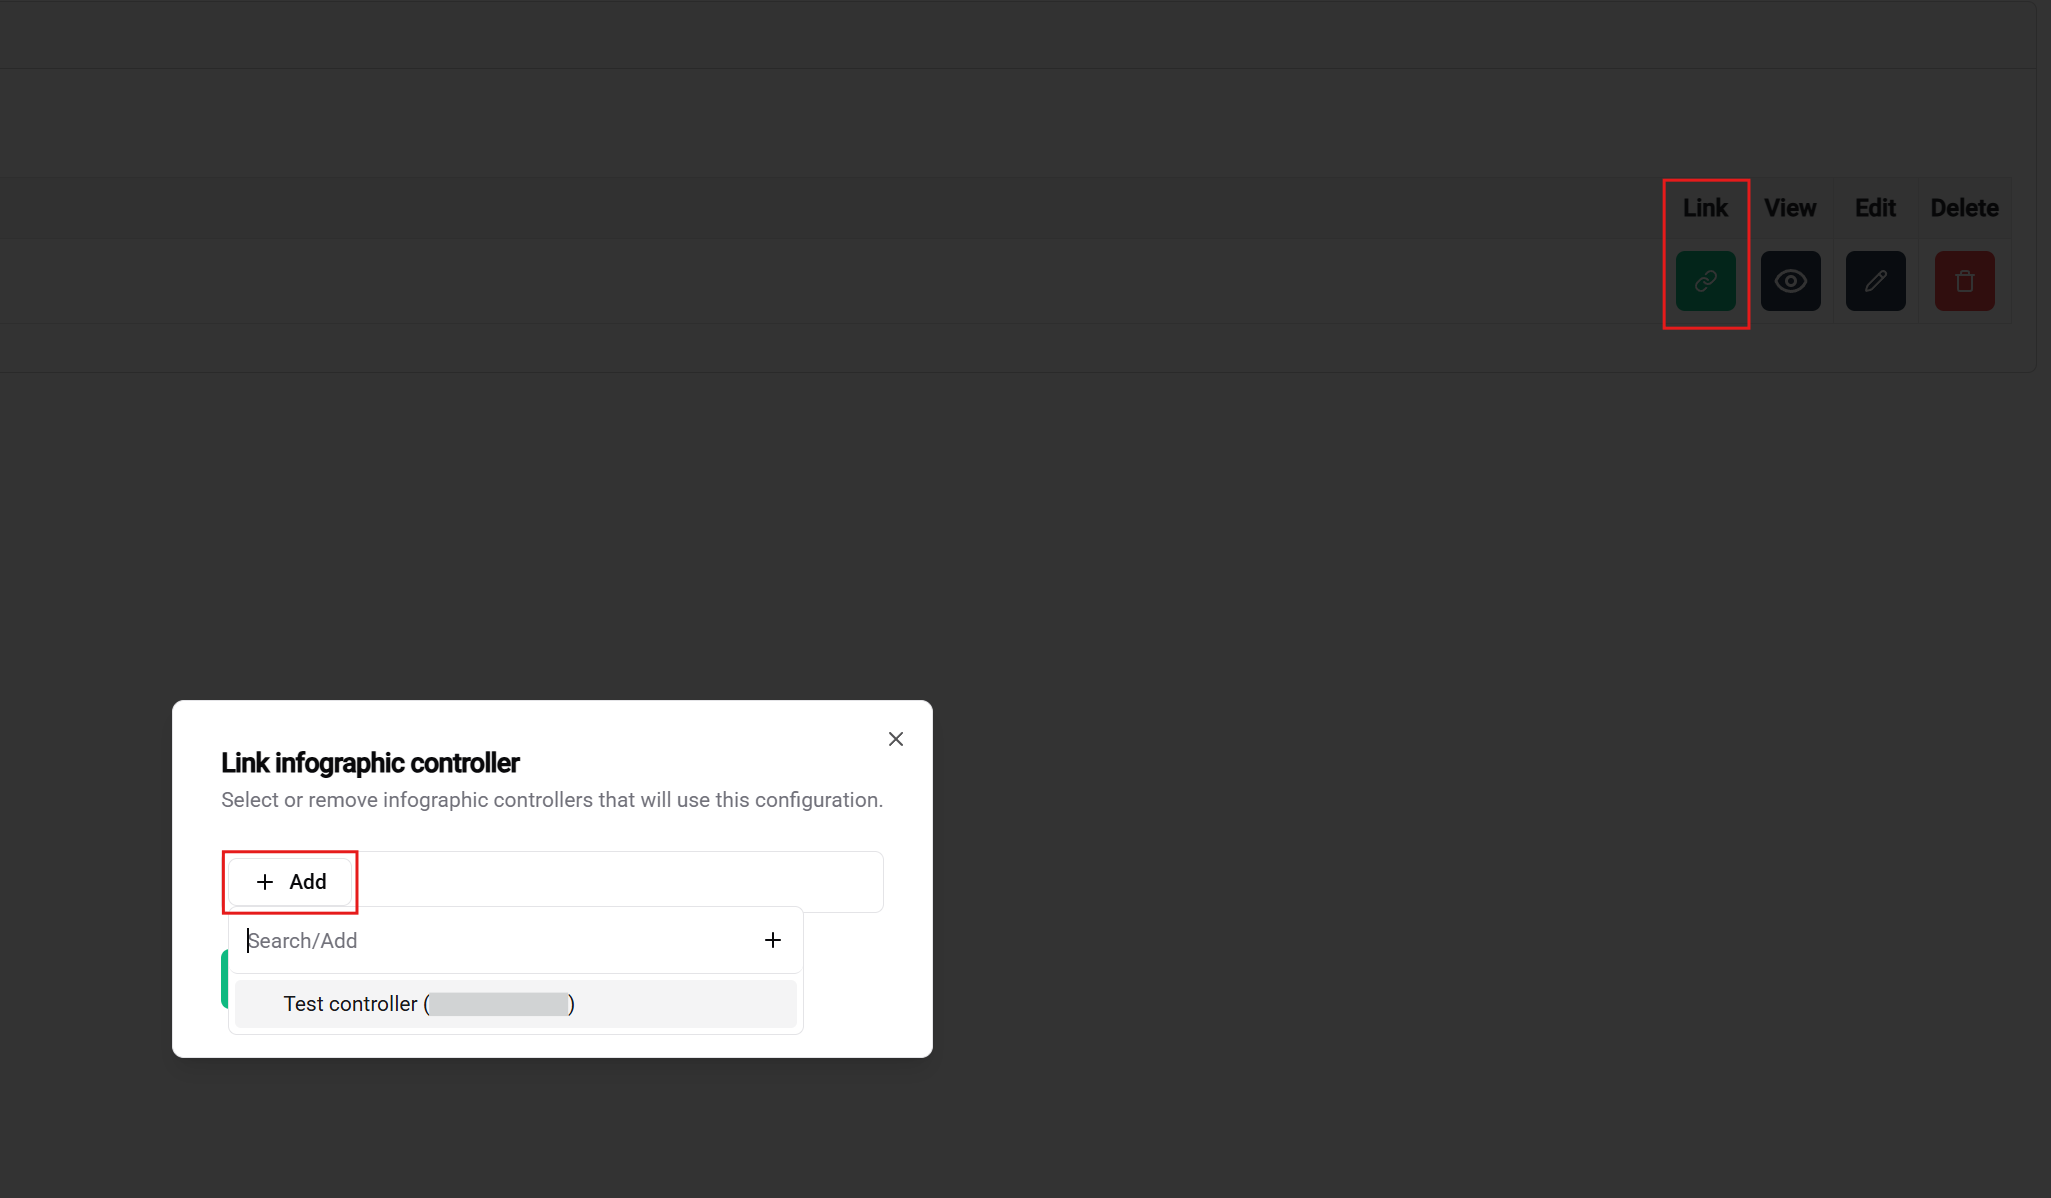
Sista distributionssteg:
- Återgå till konfigurationstabellen
- Klicka 'Reklamera Kontroller' för att länka din konfiguration
- Slutföra inställningen genom att ansluta den fysiska kontrollen
🎉 Framgång! När allt är konfigurerat, länkat och kontrollen är ansluten, kommer din anpassade offentliga visning att visas på skärmen.
🎉 Avslutning
Grattis! Du har framgångsrikt ställt in ett komplett offentligt visningssystem i SmartgridX.
Vad Du Har Uppnått
✅ Kontrollhantering - Tilldelat och registrerat din offentliga visningshårdvara
✅ Malldesign - Skapat en återanvändbar visuell layout
✅ Konfigurationsinställning - Tillämpat din mall på en specifik installation
✅ Systemintegration - Anslutit alla komponenter för livevisning
Nästa Steg
🖥️ Visning Klar: Din offentliga visningskontroller kan nu visa din anpassade visualisering på vilken ansluten skärm som helst
📚 Utöka Din Kunskap: För avancerade funktioner och detaljerade anpassningsalternativ, utforska de omfattande dokumentationssidorna för varje komponent
💬 Behöver Du Hjälp? Vårt supportteam finns tillgängligt för frågor, funktionsförfrågningar eller felsökningshjälp
📚 Relaterad Dokumentation
Nästa Steg
Efter att ha framgångsrikt reklamerat din kontroller:
- 🎛️ Länka Kontroller - Anslut till visningshårdvara
- 📐 Skapa Mallar - Designa dina visuella layouter
- ⚙️ Konfigurera Visningar - Tillämpa mallar på installationer
🚀 Redo att skapa mer? Du kan nu designa ytterligare mallar och konfigurationer för att passa olika installationer och användningsfall!